26.9.10

Bundle Monster Nail Art | Fall / Autumn 2010 Nail Art


This purple polish is new to my collection. It is from Sally Hansen's Insta Dry Fast line in "Pronto Purple."OMG this is one of the prettiest purples in my opinion. I really really should of took pictures of this color by itself before I started designing them, but I will add a swatch I found at the end of this post. My only complaint about this nail polish was it was kinda thick and goopy. Some nails the application was very nice, and on others it wasn't such a good experience. lol But it is such a pretty color that I was going to make it work. I have the products I used listed below in the order I used them ..

Base (Purple) Color: Sally Hansen "Pronto Purple"
Sheer Purple Glitter Color: Pure Ice "Busted"
Leaf Image: BM 04
Light Stamping Color: Pure Ice "Feeling Hot"
Pink Stamping Color: Pure Ice "Love"


And here is the swatch I found courtesy of Steph's Closet.

Pretty Pedicure


Base Color: Pure Ice "Feeling Hot"
Glitter Color: Hard Candy "Break Up"

I bought 3 new nail polishes yesterday. 1 of the 2 was Hard Candy in "Break Up" which is a clear polish with large holographic hexagon like glitter. Whenever I get a new nail polish, I do a few swatches on a paper plate and do a few tests runs to figure out which combinations I like best. This polish's glitter has a different effect with each nail polish you put under it. I like this combination the best since I felt like they complimented eachother very well. There is a little bit of a rough texture after this nail polish dries, but I was still able to stamp over it.

23.9.10

Doggy Manicure

My momma dukes came over earlier today and in the midst of playing around with my nail polish collection, we came up with the great idea to make Sassy, our beautiful black lab just a little more beautiful. lol We took a pink chrome color for NYC and quickly painted her little claws. You can tell Sassy loved them because she was prancing around proudly afterwards. haha. Of course she scampered off while I tried to take pictures, but I did manage to get some lol. Here you go ....


20.9.10

KONAD Nail Art | Pink Slanted French Tip Nail Art


These are my current nails at the moment. I wish I had more pics to post, but the lighting was not in my favor that day. In my hand is a bracelet I got from Claires, which I absolutely love.

Base "Light Pink" Color: Sally Hansen "Cotton Candy"

Hot Pink Color: Sinful Colors "Cream Pink"

Nail Stamping Color: Pure Ice "Love"

Image Plate Used: BM 20 (Bundle Monster from Amazon.com)


FYI, sometimes when I am writing a post, my blog will do this really annoying double space thing like above. It makes me feel like I am writing a paper for school since that is the only place I ever used double spacing lol

15.9.10

Bundle Monster Nail Art | Purple Nail Art


Heres the nail design I just took off. I am thinking of a new design for my nails now, so I might post again tomorrow. I have the products I used listed below in the order I used them.

Base Color: Pure Ice "Scandal"
Wheel Image: BM 03
Purple Stamping Color: Pure Ice "Outrageous"
Blue Stamping Color: Pure Ice "Pussy Cat"

Is it just me, or when you get the time to sit down and do your nails, and your looking at all your nail polishes and image plates, you have NO idea what the heck you wanna do with your nails? lol That is what I am going through right now. I am thinking of painting my nails a light pink, with a darker pink to do a slanted french tip, then some design on the darker pink, with a silver stripe seperating the colors. Not sure how much I am going to love it, but I will be posting pics of it very soon. Oh yeah, I was trimming my nails earlier and went to clip my pointer finger to straighten the tips a little, and I accidently just clipped my nail clean off! It looks soo silly since the nails next to it have started to get longer, but oh well, since I got a nice straight cut it should grow back nicely lol.

12.9.10

LuxAddiction Inspired Cell Phone Case *DIY*

I fell in love with the LuxAddiction cases since I first saw them, so I decided to make one myself. When I first started this project, I had so much trouble finding the gems I wanted to use such as the flowers, hello kitty, crown, etc. I searched the internet for a while and found that the gems with the flat back are called "cabochons" so I started doing searches for that. I found 2 sellers on etsy that have a great selection. The first seller I bought from was Misssapporo and I purchased the big flowers, little flowers, heart gemstone, and a few others. I would HIGHLY suggest this seller. The customer service was great and even though they were shipping from Japan, I got my package within a week! =) I am always happy about fast shipping because I am the most impatient person when it comes to waiting for stuff to come in the mail. I also purchased from Mayan who has sooooo many cute cabochons to choose from. In the time I spent looking for cabochons, this seller had the best variety. However, shipping was a painfully long wait, a little over a month. I didn't receive one of my items, but they agreed to reimburse me and it wasn't too much of a big deal to me. Even though I would have liked to receive them sooner, I think it was definately worth the wait. I have a few tips if you want to make your own 3d blinged out cell phone case...

*I used E-6000 glue for this along with a random strong adhesive I found at the house. Any strong clear glue you have should work just fine.

*Pick a cell phone case that has a similar color to your cabochons. I used a hot pink case with light pink cabochons.

*Have a plate with all your gems facing up so they are ready to go as soon as the glue is applied to your cell phone case. The reason is because the glue will dry FAST, like really fast. Sometimes the glue would dry before I got done laying down rhinestones on top of it.

*Take a QTip and cut the cotton part off one end and use this to pick up and place the rhinestones. I would wet the tip of the QTip (the side I cut off) on a damp paper towel to pick up the rhinestones which made placing them on the phone very easy.

*Before you glue anything, lay down your big cabochons on your cell phone case and move them around to get an idea of how you want the final product to look. Take a picture so you can remember the pattern.

*To acheive the 3d effect you will have to layer the cabochons on top of eachother. This was the most difficult part I think of designing the cell phone case. You want to start one cabochon at a time, glue it down, then place rhinestones around it. Take you next cabochon and figure out where you want to layer it, mark the spot with a marker, eye liner brush, or anything you can find to mark the cell phone case with. After that, place rhinestones around (or under which is what I had to do with the crown cabochon since you could see through it) the area. Between placing the rhinestones down, put the big cabochon back on to make sure everything is fitting properly. Once you have the rhinestones down, put some glue on the big cabochon on the spots that will be touching the cell phone case.

This is the design I came up with. It's very cute and pink, and best of all I think it looks just like a LuxAddiction case.


If you are contemplating making your own cell phone case like this, there are a few things you should consider first. If you have a craft store in your area that has the type of decorations you would like to use, I would suggest buying them there. Since I ordered mine from Hong Kong and Japan, it was a little more expensive than I would have liked since I paid for shipping and all that good stuff. Also, when ordering online, you will have to buy some of the pieces in bulk. For example, the flowers and hello kitties came in a pack of 4. So all in all, if you plan on decorating more than just your phone, this is a good deal. I am using my leftover cabochons for my ipod case and will use whatever I have left over for little things. The cost to make just the cell phone case I would say is about $50, but keep in mind you will need to buy more than what you need for just the cell phone case. If you just want the cell phone case and nothing but, I would suggest just buying one from LuxAddiction or Etsy, which will be around $50-$100. I hope this gave you some inspiration for your designs, if you had any questions feel free to comment.

11.9.10

More Nail Designs

Since I haven't posted in forever, I am going to show you a few pictures I took in between posting. I took ALL of these pictures with my cell phone camera, so please excuse the quality. Also, most of my pictures I took in my car or on the go, in case your wondering about the backgrounds lol.


Orly "Space Cadet"
* 2 coats *

This picture does absolutely no justice for this color. It's like a dark green, purple, goldish, pinkish duochrome foil looking nail polish and I am in love with it. The colors are perfect for fall and the application was flawless.


I wanted to do really girly nails and this is about as girly as it gets. lol It would have been even cuter if I added some rhinestones on the polka dots, but I will the next time I used this design. I have the products I used, in the orders I used them below ..

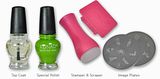
Base Color: Sinful Colors "Cream Pink"

Glitter Color: Sinful Colors "Pinky Glitter"

Polka Dot Image: BM 19 with Konad Special White Polish

Crown Images: BM 08 with Konad Pearl Black Polish

Top Coat: Seche Vite


I believe this was the first nail design I made with my Bundle Monster image plates. This was also before I started using Seche Vite top coat, so my other top coat smudged the hearts a little bit.

Base Color: Sinful Colors "Glass Pink"

Pink Tip Color: Flormar "32"
Nail Tip Design: BM 17 with Konad Pearl Black Special Polish
Heart Design: BM 03 with Konad Pearl Black Special Nail Polish


This is a nail design that I obviously did way back during summer. I used the sponging technique to fade yellow, orange, and pink and used a glitter color on top to help blend the colors.


Base (Yellow) Color: Sinful Colors "Let's Meet"

Orange Color: Sinful Colors "Cloud 9"

Pink Color: Flormar "32"

Glitter Color: Sinful Colors "Pinky Glitter"

Bottom Flower Image (2 flowers): M54 with Konad Pearl Black Special Nail Polish

Top Flower Image (1 flower): M57 with Konad Pearl Black Special Nail Polish


I did this nail design in the begining of my nail stamping days. Needless to say, I will have a much more interesting design next 4th of July. But I figured I would post it since it's simple and still might give someone an idea for their nails.


Red Color: Sinful Colors "Under 18"

Blue Color: Pure Ice "All Night Long"

Star Nail Design: M76 with Konad White Special Nail Polish


I have a few more random designs that I will be posting this week. I generally do my nails twice a week, sometimes once a week if I am busy or too lazy to pull all my nail gear out lol. I am going to try to post weekly for now on so keep checking back. AANNNNNDDDD .. i am debating to get a video camera so I can post nail tutorials on YouTube, if and when I do I will be sure to post lots of links. =)

7.9.10

Bundle Monster Image Plates Review

I ordered my bundle monster image plates about a month ago and wanted to wait till I've used them a few times before reviewing. Bundle Monster image plates can be bought on Amazon.com or you can click this link. You will get 21 images plates, with a total of 139 designs 'for only $17.99!! Bundle Monster also has a bunch of other great deals on rhinestones and nail cane sticks. I took detailed pictures of all the image plates so you can really get a good look at them. Please keep in mind that I took the pictures with the protective film still on the image plates, hence the reason some look like they have scratches.


Many people complain about the full sized images being too small, and I agree. I took this picture to compare my nail to the full sized image so you can get an idea of their true size. When I used the full images, they fit on all my nails except my thumb. The design had gaps between the edges of my nail on my thumb only.


I have also read in reviews that the sides of these image plates are sharp and cut themselves when using these image plates. I have not had this problem, but if you do, covering the bottom with masking tape or a thin foam should fix the problem.
Pros:
* The price! Your not going to find a deal anywhere else where you can get 17 images plates for $17.99. (if you do let me know. lol)
* Lots of cute designs, and they even have an image for just about every holiday which makes me very happy =)
Cons:
* Full sized images could be bigger.
* Some of the designs could have a little more detail.
Overall, I would definately suggest buying these. This set would be great for beginners or nail junkies that can never have too many nail supplies. I have another picture below of some swatches I've made with the new image plates. If you clicked the link above for where to buy these, you can see the swatches below on amazon under "customer images."

Related Posts Plugin for WordPress, Blogger...