24.10.11

Halloween Nail Art & Tutorial !!


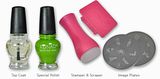
Here is my first Halloween nail art designs of many to come. I wanted to start doing my Halloween manis sooner but my birthday and me & my boyfriends anniversary is in the middle of October. Needless to say, I had to take a break in between from the orange & black polish during that time. lol But now that all of that is said and done, I can continue my Halloween Nail Art series. For this design I am using the following products...

Black Polish: Sinful Colors "Black on Black"
White Polish: Sinful Colors "Snow Me White"
Orange Color: Sinful Colors "Cloud 9"
Black Stamping Polish: Konad Special Polish "Black Pearl"
White Stamping Polish: Konad Special Polish "White"
Image Plate: BM225
Pearls: BornPrettyStore.com
Rhinestones: Ebay.com


Along with the pictures, I also made a tutorial. =)


Btw. Sorry for not posting as much recently. If you remember in my last posts, I have been having some computer issues. Especially with Blogger, which leads me to believe I probably have 341 Trojan viruses. lol But I am getting my computer all strapped up with virus protection and getting all of the bugs out. I can't even begin to express how excited I am to have a normal working Internet so I can get back into the blogging game. lol

I hope you liked the design! I am going to work on another post tonight. I have some pictures of one of my top favorite nail polish combos along with some magnetic nail polish swatches!!

23.10.11

Cute Nail Art Designs!! *Major Update*


Here are some nail designs I have done in between postings. Since there is a lot of designs I am just going to jump right into the product lists ...

Dark Purple Color: Sally Hansen "Pronto Purple"
Light Purple Color: Pure Ice "Outrageous"
Image Plate: BM208


This is a design I am sure all of you have seen or even done before. I would of added more detail to this but I wanted to do something just simple, quick, and easy because I had another nail design I wanted to do the day after.

Blue Color: Orly "Frisky"
Pink Color: Sinful Colors "Soulmate"
Red Color: Sinful Colors "Be My Valentine" (nail striper)
Green Color: Sinful Colors "San Francisco"

Black Color: Sinful Colors "Secret Admirer"
Glitter: Wet'n'Wild "Party of Five Glitters"
Matte Top Coat: Essie "Matte About You"

I revamped the design above after wearing it for a few days. For this design I added some Chanel Fimo Slices from the Bornprettystore.com. And some decorative hexagons I bought from Ebay.com.

I LOVED this pedicure!! It is one of my top favorite nail designs. I actually took this picture about 2-3 weeks after wearing this pedicure. So for those of you who ask how long the gems stay on for, it is a very long time if you add a layer or 2 of top coat.

White Color: Sinful Colors "Snow Me White"
Black Color: Sinful Colors "Black on Black"
White Stamping Color: Konad Special Polish in "White"
Black Stamping Color: Konad Special Polish in "Pearl Black"
Image Plate: BM223 (Bundle Monster)
Decorations: All from Ebay.com =)

13.10.11

Adoree Swatches & Review!!


I recently received some new products to review from Thresa at Esther's Nail Center!! One of which was nail art stamping plates which I used to create this Halloween monster inspired nail art design.

Green Color: Sinful Colors "Innocent"
Black Color: Konad Special Polish "Pearl Black"
Image Plate: B32

Esther's Nail Center introduced a new set of stamping plates. To be exact this set includes 19 image plates for just $15.95. I've seen these image plates floating around on Ebay and some other websites but I never seen them sold in a set which is very convenient. I also have to admit, since I saw them on Ebay I had suspicions that these image plates might be cheap and might not work as well as the Konad or Bundle Monster image plates. However, I was very impressed with how clear the images came out when I stamped with them. As you can see from the picture above, the image transferred beautifully to my nails you can see every detail of the design. Overall, I really liked these plates and I can't wait to try some more of the designs! Below are pictures of the plates I received. I received 6 of the image plates for reviewing purposes, but when you order your set you will get ALL 19. =)


 *click to images to enlarge*


Now onto the swatches. I received 4 Adoree polishes to swatch and review for you. If you seen my reviews before for Adoree you will already know the key features of this polish. But for those of you who don't, allow me to elaborate. Adoree polishes are Formaldehyde, Toluene and DBP (Phthalate) FREE which makes them great for daily use. They also have over 150 colors to choose from. My favorite part about these polishes is their dry time. I am so impatient when it comes to waiting for my nail polish to dry so I am always happy to have a quick drying polish. Adoree polishes are also very pigmented, all the swatches below are just 2 thin coats. The swatches are also WITHOUT top coat because these polishes already dry with a high shine.

Copper Clay
I must first mention that this picture does not do this polish any justice. It was so hard to capture the beauty of this polish in just one click of the camera. If you look at the bottle in the picture though, you can see a duo chrome effect with flashes of brown, purple, orange, and gold colors. Depending on what light you are in, your polish will take on a different effect, which are one of my favorite types of polishes.


This polish is a perfect blushing creme color. Very simple, yet very chic. I was excited to see this color in the package because I am a huge fan of pink polishes, but also colors that can be worn as neutrals, so this polish was the best of both worlds.

Reef Green
I think this picture speaks for itself. This polish is packed with a ton of micro green glitter which allows you to have green sparkly nails in 2 coats. This polish also has a darker jelly base v.s. a clear base which I think really helps achieve a more opaque look with less coats and less dry time.


 Shocking Red
The name of this polish suites it well since this is a shocking red color. Not shocking to the point where you are going to stop traffic, but shocking enough for everyone in that traffic to notice your classic red mani. I love how this is jelly based with a slight subtle shimmer to make the polish a little extra special. I will definitely get my use out of this polish when I start rolling out my Christmas and Holiday nail art designs.


Moving forward- Thresa let me know about a new website her and Esther created called The Honey Day. It is basically a monthly subscription that is delivered right to your door and includes candies and sweets from ALLLL over the world. Similar to a magazine subscription but with candy. Similar to those beauty boxes you might have heard of, but with candy. For those of you who have a sweet tooth as big as your nail art obsession, this is definitely worth checking out.


There will be a *NEW* post later today or tomorrow, with new nail designs and even a Halloween nail tutorial!! So be sure to check back!!
Related Posts Plugin for WordPress, Blogger...